“The upper-left tag on our BI-36U was dim, but a side-lit phone photo showed the serial clearly. That prevented the wrong gasket revision from being ordered for our Alta Heights kitchen. The technician still verified it on site, and the correct OEM seal arrived for the first visit.”
4.9/5 network rating372 verified repairs
Napa · 94558 / 94559 · Model & Serial
Where to Find Your Sub-Zero Model & Serial Number (Napa Guide)
On a Napa built-in, the Sub-Zero model and serial tag sits on the upper interior side wall of the fresh-food compartment; on wine and freezer columns and undercounter drawers it is the inner side wall; on built-ins and integrated units, check behind the lower grille; wine units use the inner door frame. Photograph model and serial in one shot.
On this page
Model & serial number examples
Sub-Zero model designations follow patterns by product line. Common examples:
BI-36U — Built-in, 36-inch, undercounter-style column
BI-48SID — Built-in, 48-inch, side-by-side
648PRO — Pro 48 series, 48-inch built-in
424 — Classic 24-inch built-in fridge
IW-30 — Integrated wine, 30-inch
UC-24R — Undercounter refrigerator
Serials are typically 01234567 (8 digits) or a letter-prefixed code like A01234567. Both model and serial are on the same tag.
Not sure which series you have? The diagram and table below show where to look.
Start here · first place to look
Sub-Zero model & serial number location by unit type
Before you call about a Napa built-in or an up-valley wine unit, find the tag and photograph the model and serial together. This quick table shows the first place to look and a backup spot for each Sub-Zero type.
| Unit type | First place to look | Backup location |
|---|---|---|
| Built-in / column (BI series) | Upper interior side wall of the fresh-food compartment, near the top shelf bracket | Behind the lower kick-plate grille — pull it out by hand, common on older 94559 downtown units |
| Undercounter drawer / unit (UC series) | Inner left side wall near the top, visible with the drawer or door open | Compressor-access panel at the lower front, sometimes duplicated there |
| Wine column / storage (W, IW series) | Inner side wall above the lowest rack, no shelves removed | Inner door frame — useful for the dual-zone cellar units common in Browns Valley homes |
| Classic / freestanding (424, 532, 650, 690) | Upper-left interior wall of the fresh-food side | Back wall near the top on pre-2000 cabinets; aged tags up-valley may need angled side light |
Every Sub-Zero type covered
Where the Model & Serial Tag Lives — by Appliance Type
Sub-Zero does not put the tag in the same spot on every product line. This table covers the full range so you know exactly where to look before prying anything open.
| Appliance type & common models | Tag location | Access notes | Sub-Zero-specific detail |
|---|---|---|---|
| Built-in refrigerator / BI series BI-36U, BI-48SID, BI-42S, BI-30UG |
Upper-left interior wall of the fresh-food compartment | Open the refrigerator door; look at the left side wall near the top shelf bracket. No tools needed. | On very early BI units (pre-2000) the tag may also appear on the back wall of the compartment near the top. |
| Pro 48 / Classic series built-in 648PRO, 650, 690, 532 |
Upper-left interior wall, fresh-food side | Same as BI series. On 48-inch side-by-side models the tag is always on the refrigerator door side, not the freezer side. | The 648PRO and 650 share a cabinet width but use different sealed-system configurations — the serial confirms which. |
| Freezer columns BI-36F, BI-18F, 700BF, 36F |
Interior left wall, mid-height | Open the freezer door fully; look at the left interior wall. May require removing one basket or wire shelf to see clearly. | Freezer columns share part numbers with the freezer section of paired refrigerator columns only within the same generation — the serial range confirms compatibility. |
| Integrated refrigerator / freezer IT-30, IT-24F, IT-18F |
Behind the lower kick-plate grille | Pull the grille outward by hand (no tools); the tag is affixed to the frame or front of the compressor compartment visible from below. Also sometimes on the interior left wall. | On integrated units, the grille pulls out without clips on most generations — do not pry. The tag is designed to be read this way. |
| Wine storage columns W-24, IW-30, W-30, 424, 427 |
Interior side wall (left), visible when door is open | Open the door; look at the left interior side wall above the lowest rack. No shelves need to be removed. | Wine column serials determine which thermistor calibration and which door gasket profile is correct — a worn gasket causing condensation uses a different replacement part number depending on serial range. |
| Undercounter refrigerator / freezer UC-24R, UC-24BG, UC-24F |
Interior left wall or compressor compartment door | Open the door fully; look at the interior left wall near the top. On units with a lower compressor access panel the tag is sometimes duplicated there. | Undercounter models have serial-specific fan and thermistor variants; ordering without the serial commonly results in a non-compatible part. |
Panel-ready and custom-panel units
If your Sub-Zero has a custom wood or painted panel on the door, the tag is still on the interior wall or behind the grille — not on the panel itself. The panel covers the appliance exterior only. You do not need to remove the panel to find the tag.
Decoding the tag
How to Read a Sub-Zero Model Number and Serial
Sub-Zero model strings are abbreviated product descriptions. Once you know the pattern they give you a thumbnail of what the unit is, which matters when you are describing a symptom by phone.
Model structure
Most modern Sub-Zero models follow a pattern like prefix – size – suffix. The prefix names the product line (BI = Built-In, IT = Integrated, IW = Integrated Wine, UC = Undercounter). The number is nominal width in inches. Suffixes like U (undercounter-style), S (side-by-side), F (freezer), G (glass door), R (refrigerator), PRO (Pro series) add configuration.
Older Classic-series models (424, 532, 650, 690) use a three- or four-digit number that encodes capacity and configuration in a now-discontinued format. A 424, for example, is a 24-inch, two-door unit — fridge over freezer in a single cabinet.
Serial number structure
Sub-Zero serials are typically 8 digits, sometimes with a letter prefix. The first digits encode the production period; Sub-Zero has revised key parts — boards, fan assemblies, door gaskets, compressor mounts — at specific serial-range cutoffs. Two units with the same model designation but serials a year apart may take different control boards or different gasket profiles.
This is why we always re-read the serial on-site even after you have already given it by phone. Built-in appliances occasionally have multiple tags if a component was swapped at an earlier service visit, and the original tag stays.
Quick model decoder
BI-36U— Built-In, 36″, undercounter columnBI-48SID— Built-In, 48″, side-by-side648PRO— Pro 48 series, 48″, built-in424— Classic 24″, fridge/freezer comboIW-30— Integrated Wine, 30″UC-24R— Undercounter Refrigerator, 24″IT-30F— Integrated, 30″, Freezer column
The serial (example: 01234567) is always on the same tag as the model. Photograph both.
Why the serial decides the repair
Sealed-System Suspicion and What the Serial Confirms
When a Sub-Zero is warm on both sides — not just one compartment drifting — the sealed system becomes a candidate. Understanding what that means in plain language helps you know what to expect from a diagnosis, and why the serial number is not a formality.
A Sub-Zero's sealed system is the pressurized refrigerant circuit: compressor, condenser coil, capillary tube or expansion valve, and evaporator. When this circuit fails — through a refrigerant leak, a compressor mechanical failure, or a restriction — the box warms entirely and cannot recover regardless of how long you leave it running. This type of diagnosis requires EPA-regulated verification before any refrigerant work is performed; it is not a DIY repair and it cannot be confirmed from the display or a symptom description alone.
What a technician actually confirms before calling it a sealed-system job: temperature readings at the evaporator inlet and outlet (not just the air inside), suction pressure if accessible, and condenser temperature under load. A unit that looks like a compressor failure is sometimes a failed condenser fan or airflow restriction rather than a $1,200–$2,900+ sealed-system job. That confirmation step protects you from an unnecessary quote.
The limitation to know: even after a technician confirms that the sealed system is the cause, the serial number determines which refrigerant type your specific unit was manufactured with, which compressor mounting hardware applies, and which replacement compressor or sealed-system kit is OEM for your production run. Without the serial, ordering sealed-system components for a Sub-Zero is guesswork — the wrong compressor may physically mount but operate outside the design pressure range for the refrigerant in that circuit.
For more detail on when a sealed-system diagnosis is warranted, see the sealed system & compressor page. And because the production era fixes which gas your circuit runs, the serial also shapes the refrigerant line on a certified repair bill.
Three things the serial confirms for sealed-system work
1. Refrigerant type. Sub-Zero units across production years use R-134a, R-600a or R-290 — the serial and model together confirm which circuit your unit runs. Using the wrong refrigerant damages the compressor.
2. Compressor revision. Sub-Zero has changed compressor suppliers and mounting specs at serial-range cutoffs, even within the same model designation. The OEM compressor for serial 05xxxxxx may differ from the one for serial 12xxxxxx on the same BI-36U model.
3. Capillary tube / expansion device. Some serial-range revisions updated the metering device; installing the prior revision's sealed-system kit on a later unit causes undercharge symptoms even when the refrigerant fill is correct.
Door gasket leak and condensation — also serial-dependent
A door gasket leak, visible condensation or a frost line on the door frame is a more common and usually less expensive repair — but the replacement gasket profile still depends on the serial range. Sub-Zero revised the magnetic gasket specification on several BI models at specific serials. The right gasket on the wrong serial range will seal loosely and allow warm-air infiltration within a few months.
Built-in access — know before you move anything
Built-In Cabinet Removal and Reseat Risk
Sub-Zero built-ins are designed to be serviced in place. The condenser, evaporator, fans and control board are accessible through the front grille and interior panels on most models without moving the unit out of the cabinet. This is intentional — and it is important.
Moving a built-in Sub-Zero out of its cabinet opening carries real risk. The unit is typically secured to the cabinet frame with screws at the top or sides; removing those without noting their position can leave the unit unsupported. More importantly, the custom door panels, hinge adjustments and alignment that ensure the door seals correctly must all be re-verified after any reseat. A unit that goes back into the opening even slightly misaligned will develop a door gasket leak or condensation at the frame within weeks — the door compresses the gasket unevenly and the seal fails at the high point.
The evidence we document during a cabinet-adjacent visit: before we move anything, we photograph the panel alignment, measure the reveal (the gap between the door panel and surrounding cabinetry), and check hinge tension. After any reseat we verify alignment to the original measurements before closing the cabinet. Cabinet-safe service is a full page on what that process looks like and why it matters for Napa kitchens with expensive custom millwork.
When a service request involves cabinet access
If your symptom requires moving the unit — compressor replacement, a rear-access sealed-system repair, or condenser cleaning on an older unit without a front-access grille — we will tell you in advance, quote the cabinet-reseat verification as part of the job, and photograph the before state. You should not authorize any Sub-Zero built-in repair that does not include a post-reseat alignment check as a line item.
Before the technician arrives
What the technician verifies before parts are quoted
Correct model and serial verification helps prevent wrong-part orders. The technician verifies the appliance tag before parts are quoted or installed.
- The model and serial tag. Photograph it under good light; if the tag is dim, try a flashlight at an angle. Book online, not a hand-transcribed number — transcription errors are the most common reason the wrong part is ordered.
- The display and any alarm code. If the unit is showing an error code, photograph the display before clearing it. Note the exact sequence of characters, including any leading zeroes or letters.
- The door frame and gasket. If your symptom is a door gasket leak, condensation or frost line, photograph the gasket at each corner and along the hinge side. A cracked or deformed gasket is often visible and helps us bring the correct replacement.
- The condenser grille area. For built-in units, photograph the lower front grille from the front. If lint or debris is visible through the grille, that is useful context for the diagnostic.
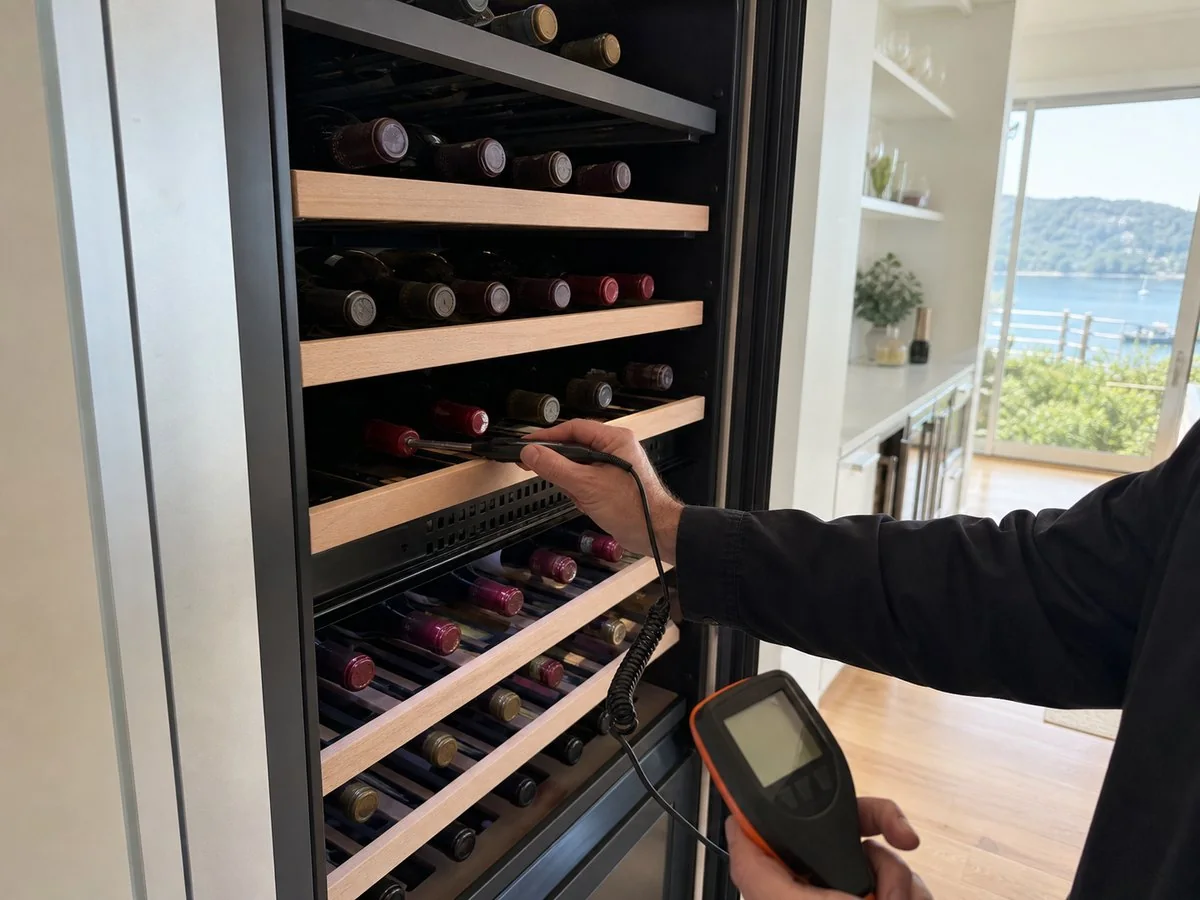
- The interior — actual temperature if you have a thermometer. A photo of a probe thermometer reading inside the fresh-food or freezer section is more useful than "it feels cold." If you have a wine unit that is drifting, include the display set-point alongside the probe reading.
- Do not unplug or reset the unit immediately before the appointment. Cycling power clears the compressor duty-cycle history and some fault codes that the technician uses to narrow the diagnosis. Leave the unit running as-is.
Schedule by calling (628) 209-6820 or using Book Online. The model tag is verified on-site before parts are ordered.
Napa & 94558 / 94559
How Location Affects the Model & Serial Search in Napa
The physical condition of the model-tag and the scheduling challenge around reading it both vary by neighborhood and by how the home is used. These are not generic notes — they reflect patterns we actually encounter.
Browns Valley
Ranch and farmhouse kitchens here often have Sub-Zeros that have been in service for 15-plus years. The model tag on older Classic-series units (the 400 and 500 line) can be darkened by cooking vapors or stuck behind a shelf bracket. Photograph it before your service appointment — if the number is illegible, describe what you can partially read when you call.
Alta Heights
West-facing hillside kitchens with afternoon sun loads often see their Sub-Zero condensers working harder in summer. We frequently find the condenser grille blocked by accumulated dust, which is visible once the grille is pulled — same access point as the integrated-unit model tag behind the grille on some units.
Downtown / 94559
Downtown Napa has some of the oldest Sub-Zero installations in the county — units that date to the 1990s where the tag has been repainted over, damaged by a previous service visit, or is simply worn. These are the cases where a technician may need to cross-reference the serial block against known production records rather than read a clean label.
Silverado & second homes
For 94558 second-home owners, model and serial verification is especially important because a wrong-part order can add weeks when the visit window is only a weekend. The technician verifies the tag on-site before parts are quoted.
Common questions
Six questions about finding and reading a Sub-Zero tag in Napa
Where is the model number on a Sub-Zero built-in refrigerator?
On most Sub-Zero built-in refrigerators (BI series), the model and serial tag is affixed to the upper-left interior wall of the fresh-food compartment. Open the door and look at the left side wall roughly at eye level or just above the first shelf — you will see a paper or metallic label with a barcode, the model designation, and an 8-digit serial. On some older or integrated models the tag may be behind the lower kick-plate grille instead. No tools are required to read it in either location.
My Sub-Zero tag is worn and the numbers are illegible — what should I do?
This is common in downtown Napa (94559) and in older second-home units in Browns Valley that have been in service for many years. Try photographing the tag under strong side-lighting or a flashlight at an angle — embossed digits on older labels sometimes read better that way. If the tag is truly unreadable, a technician can sometimes cross-reference production dates and known serial blocks against the unit's physical characteristics and installed components. Use Book Online and describe the symptom along with whatever you can partially read.
Why does Sub-Zero need the serial number, not just the model?
Sub-Zero has revised parts — evaporator fans, control boards, door gaskets, compressor mounts — at specific serial-number cutoffs, sometimes mid-production run on the same model designation. The serial number tells us which revision your unit uses. Ordering the wrong revision can mean a part that physically fits but fails to communicate with the control board, or a gasket with the wrong magnetic profile that allows a door gasket leak or condensation even after replacement. The serial is not a formality — it is the part-compatibility key for Sub-Zero specifically, more so than for most appliance brands.
Can I find my Sub-Zero model number without opening the appliance?
Sometimes. On wine storage units (W and IW series) the tag is on the interior side wall and visible when the door is open without removing any shelves. On undercounter units the tag is on the interior left wall, also visible with the door open. On integrated units the tag is behind the lower grille — you pull the grille out by hand and look at the frame. You should not need to move the cabinet or open any sealed panels just to read the model and serial on any current Sub-Zero product line.
Which tag photo is most useful if a property manager is at the house?
Ask for one wide photo showing the appliance and one close photo of the tag with the model and serial readable. Use side lighting if the label is worn. For Silverado or second-home access, the manager should also photograph the cabinet opening and lower grille so the technician can plan part access.
Does tag location change on wine columns and undercounter units?
Yes. Wine columns usually place the tag on the interior side wall, visible with the door open. Undercounter units often use the interior left wall. Integrated units may hide the tag behind the lower grille. Do not pull sealed panels for a tag photo; the technician can verify hard-to-reach labels on site.
Call or book online ? we'll do the rest.
Call (628) 209-6820 or book online to schedule a diagnostic window. The technician verifies model, serial, temperatures and repair evidence at the appliance before the written quote.
Related: Sub-Zero Repair overview · Door gasket & seal repair · Sealed system & compressor
Local reviews
Model-and-serial reviews with exact tag problem and ordering result
4.9/5 network rating372 verified repairs
“We were up-valley only for the weekend, so the caretaker sent a photo from behind the lower grille before the visit. The guide showed exactly where to look. The technician matched the serial range to the right fan revision, which saved a second trip during our short Rutherford stay.”
“Our label had cooking residue and only 6 of 8 serial digits were readable. The tech used angled light, cabinet photos and the installed board layout to narrow the part family before quoting. That 20-minute verification avoided ordering a control board that looked right but was wrong.”
Service desk: 1300 First Street, Suite 368, Napa, CA 94559. Visits are scheduled by appointment; call before stopping by.